TOOLS & SUPPLIES
Practice Vinyl – https://www.albrightssupply.com/10-Yard-Store-s/1857.htm&Click=395
Cotton Batting – Best to find it locally
Muslin: https://www.albrightssupply.com/Muslin-p/m4000.htm&Click=3957
How To Sew Tuck & Roll Upholstery

There are many different ways to approach sewing tuck and roll upholstery, but everyone tends to develop their own style. The style we’ll be talking about today involves stuffing 2” pleats with cotton batting. You can adapt this to any size you’d like.
Quick Tips
- Keep your pencil sharp to get nice clean and clear lines.
- I use a charcoal pencil for marking on the back of fabric and muslin in this example.
- Check out the calculation video to learn how to change the pleat size.
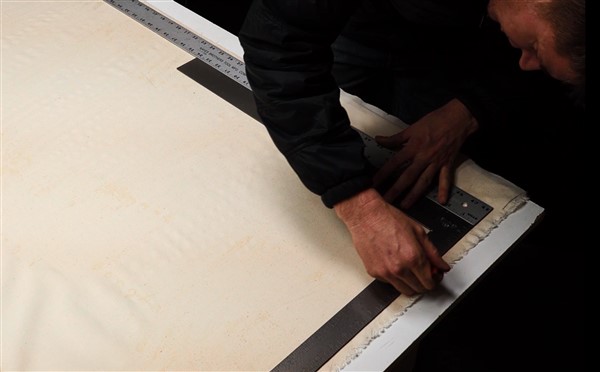
Prepare The Top Fabric
The first step is to lay out your top fabric. We will use the numbers for doing 2” pleats. In this example we will be making a piece that’s 14” tall and 24” long when finished. Sense it’s 24” and our pleats are 2”, we’re going to have 12 pleats total.

Begin by marking the piece at 15” tall to allow for a ½” seam allowance on each side.
Mark Your First Pleat

For 2” pleats, you want to put your first mark at 3 ¼”. This is because you need to have a ½” for seam allowance, 2” for the pleat, ½” for inch for the roll allowance, 1/4” for the fold allowance

The roll allowance is what gives you a nice puffiness. If you just made it at 2”, it would just be straight across and you wouldn’t have the nice roll you’re after.

You need to add a ¼” for the fold allowance to account for the material lost when you fold and sew the pleat.
Mark The Middle Pleats

On all of the pleats in the middle, mark them at 3”. We are marking all the fold lines now as a guide. Later we will need to fold it over, sew a line, and then fold it back over and sew the next pocket or pleat. You just repeat this process to sew your tuck and roll.
On the middle pleats when you fold over a pleat to sew it, you are losing a 1/2” each time. So you have to add that back along with your 2” pleat and your ½” roll allowance. That where the 3” comes from.
Finishing Your Marks

The last pleat will be 3 ¼” again like your first pleat was.

At your last pleat mark finish making your square at 15” tall.

Now, mark the lines that you marked at the bottom edge of your fabric at the top edge.

Now just ¼” ahead of all the marks you just made. It’s good idea to mark all your sew mark. This is optional, but it can help you during the sewing process. To do that, make another mark a ¼” past the marks you just made. This will allow you to fold along your fold line and then sew along this line.

Connect all of your marks so they form lines, if you haven’t already.

Finally, you should also mark which side you started your marks on. This will ensure you know which side to start sewing on. Otherwise, you may start sewing on the wrong line and things will be off when you have finished sewing the pleats.

When finished, cut out the piece.
Your Base Material

Your base material is what backs your tuck and roll. This is what you’ll sew the top fabric onto so you can make the pockets and stuff the cotton batting inside. I suggest using muslin as your base material. You can use any lightweight woven material.

Anything you have around will work, but if it’s wrinkled, steam it out so it will be nice and flat.
The next step is to mark your lines on the base material as well so that everything lines up. Your base material will be the same height as the top material you just made, so mark it at 15”

Mark your first line at 3 ⅛”. The reasoning behind this is you have your ½” seam allowance, 2” pleat width, ¼” for your fold, and ⅜” for your base shrinkage.

Base shrinkage occurs from stuffing the pleats. This needs to be accounted for in order to control the finished with of the pleats.

You’ll mark the other fold lines at 2 ⅜” each down your fabric. This comes from the 2” pleat width, plus your ⅜” base shrinkage. Continue all the way down the fabric until you reach the last one. Having your fold lines marked correctly on your base material is important to make sure that things line up evenly.

The final one should be marked at 2 ⅝”, which is your 2” pleat, plus your ⅜” shrinkage, and your ½” seam allowance minus the last ¼” fold allowance. This ¼” was accounted for on the previous pleat and isn’t needed on this last mark since it’s the final pleat. If that doesn’t make sense it’s because we are marking the fold lines not the sew lines. Don’t worry it works. I made this mistake a few times before I figured out why the last pleat was always off.
After all of this is marked, it should put you at 29 ½”.

Now, Finish marking out the piece at 15” tall and add all the same marks on top. (We don’t need to mark the sew lines on this base material.)

I like to leave some extra room at the top and bottom ends of your fabric when you cut it. You can come back and trim it after we sew everything. This also gives you some room in case you get a bit off when you’re sewing. Cut the ends of the fabric exactly on the lines you have drawn.

Remember! Mark which side you started on. Otherwise, you won’t even notice it’s wrong until you get to the very last pleat! Just put an “S” on the side you started on.
Sewing

Begin at the side you marked “S” on both pieces of fabrics. Begin by lining up the two pieces and sewing them together a tad bit less than your seam allowance, the reason being is that, when you come back to sew it to your real seam allowance as you wrap up the project, doing this will hide all the stitches you’re about to make. The seam allowance is ½”; sew just a hair under a half inch (like a 1/16” less). It doesn’t have to be precise, but make sure everything is lined up straight.

Once it’s sewn up, begin sewing the folds in. Fold your extra material under the neck of the machine to get it out of the way.

Fold the top material along your fold line and line it up with the fold line on your base material. Sew it a ¼” over, which should be right along the extra line you added before to your top material.

A ¼” is usually right on the edge of the foot on most sewing machines, which is why marking your sew line isn’t 100% needed as you can fold it on your fold line and line the edge of your foot up with the fabric, but adding the sew line can be a secondary visual guide to keep things straight and even.
As you sew things up, be careful that things are even, smooth, and lining up correctly. Don’t allow your base material to bunch up while you sew. Take your time with it.

When you get to the end, sew it a bit less than your seam allowance like you did at the beginning.
Filling Your Panel

Once your panel is sewn up, it’s time to fill it with your cotton batting. Basically, it’s cotton picked straight from the field and then rolled up into a sheet. We need to cut it into sections so they can fit into the panels. 4” usually fits nicely into a 2” pleat.

With your batting cut, it needs to be stuffed inside the pockets. You cannot use your hands because it will end up clumped in one area. Instead, you’ll need channel tins. I couldn’t find channel tins small enough for 2” tuck and roll. So I made them. If you want to learn how to make one, see this tutorial. How To Make Channel Tins for Stuffing Tuck & Roll Pleats

Now put the cotton in your tins. It helps to round the cotton with your hand so it fits better.

Place the cotton roll into your tin.

Put the other tin on top of it.

Stuffing the cotton down as you place the tin on top.

You may find it helpful to tape the tins together once you have the cotton in the tins.

Now slide the tins into the pleat pocket.

Remove the tape, and then continue sliding the tins into the pleat.

Reach into the other end of the pleat and make sure the cotton is centered into the pleat and all the way to the other end.

Then, pinch the cotton with your fingers and slide the top tin out.

Keep pinching it and remove the bottom tin.

This method will leave the cotton in the pocket nicely without any cotton balled up in one area.
Finishing It Up

After your panel has been filled, start by trimming off the extra cotton on the ends by pulling out the bit of extra that’s left. This is needed to fold it down and sew it. If you leave the extra cotton in, your seam will have far too much bulk to be sewn properly and it won’t look that good.Pull out a bit of the extra cotton, cut it off, and then stick it back in side.

Fold the seam over and judge whether it looks good or not. Try to keep it consistent. If you take too much out, just take a bit extra and replace it.
Typically, you’ll want the cotton to be ½” or so into the cover so you have room to fold it down and sew it closed.

Now lets take it back to the sewing machine and the last step is to sew the edge up. However, you need to approach it correctly. Sewing your pleats flat will widen them because of the ½ inch roll allowance.

You need to push down on the pleat behind where you’re sewing and it will help push it forward. Then, fold the pleat you’re working with towards you and a bit over the pleat next to it. When sewn, this will give you the traditional style of rolling over tuck and roll were looking for.

As you roll it over, each one is going to give it the direction so it looks like they are all falling in the same direction.

As you sew the other side, be sure to push in the opposite direction so they look consistent.

Cut off the excess and your panel will be complete!
Final Tips

- Match the direction of your panels. For instance, if your tuck and roll going left to right on your back rest, make sure it’s rolling the same direction on your cushion.
- Try to avoid inside curves. Putting tuck and roll on inside radiuses causes the top material to crease and it looks bad.
- Think about what your panel is being sewn to. Tuck and roll is very thick (about 1”) and if you sew it to another piece that’s only a ¼” thick, for example, it’s going to look strange.

Comments are closed.